NextCloud and OnlyOffice via Docker: Difference between revisions
mNo edit summary |
m (Стадий: 6 [Фаза:Утвърждаване, Статус:Утвърден]; Категория:Web Servers) |
||
| (64 intermediate revisions by the same user not shown) | |||
| Line 1: | Line 1: | ||
Here is a short step-by-step manual: | <noinclude>{{ContentArticleHeader/Linux_Server|toc=off}}{{ContentArticleHeader/Containers|toc=off}}{{ContentArticleHeader/Web_Servers}}</noinclude> | ||
Here is a short step-by-step manual: '''How to setup OnlyOffice Document Server Docker container and proxy it by Apache2 for usage via NextCloud.''' | |||
''' | == Install Docker == | ||
According to the Docker and Docker-compose installation read the guide '''[[Docker Basic Setup]]'''. | |||
== Setup the OnlyOffice Docker Container == | |||
Create a directory where the configuration file <code>docker-compose.yaml</code> and the persistent volumes will live. | |||
<syntaxhighlight lang="shell" line="1" class="code-continue mlw-shell-gray"> | |||
mkdir /home/docker/onlyoffice | |||
cd /home/docker/onlyoffice | |||
</syntaxhighlight> | |||
=== Pull the Docker images and run an OnlyOffice container for a first time === | |||
<syntaxhighlight lang="shell" line="1"> | |||
sudo docker run -i -t -d -p 8081:80 --restart=always" \ | |||
-v "$PWD/DocumentServer/logs:/var/log/onlyoffice" \ | |||
-v "$PWD/DocumentServer/data:/var/www/onlyoffice/Data" \ | |||
-v "$PWD/DocumentServer/lib:/var/lib/onlyoffice" \ | |||
-v "$PWD/DocumentServer/db:/var/lib/postgresql" \ | |||
-v "$PWD/DocumentServer/usr/share/fonts:/usr/share/fonts" \ | |||
--hostname docs --name onlyoffice-docs \ | |||
onlyoffice/documentserver:latest | |||
</syntaxhighlight> | |||
{{collapse/begin}} | |||
'''Test whether it works.''' At this point the OnlyOffice document server must be accessible the browser, probably you maybe need to wait about 10 seconds before it become accessible. Note the host port <code>8081</code> must be open (for you) within the host's firewall. | |||
{{collapse/div|#Details}} | |||
<syntaxhighlight lang="bash"> | |||
http://<host-ip>:8081/welcome/ | |||
</syntaxhighlight> | |||
Enable the integrated test examples. | |||
<syntaxhighlight lang="shell" line="1"> | <syntaxhighlight lang="shell" line="1"> | ||
sudo | docker exec onlyoffice-docs supervisorctl start ds:example | ||
sudo | docker exec onlyoffice-docs sed 's,autostart=false,autostart=true,' -i /etc/supervisor/conf.d/ds-example.conf | ||
</syntaxhighlight><syntaxhighlight lang="shell" line="1"> | </syntaxhighlight> | ||
Now you can access the examples at the following address. | |||
<syntaxhighlight lang="bash"> | |||
http://<host-ip>:8081/example/ | |||
</syntaxhighlight> | |||
{{collapse/end}} | |||
{{collapse/begin}} | |||
'''Export the configuration files.''' For some reason the configuration files cannot be exported via the volume option as this is done above for some other directories. So, if we need that, we need first to copy them manually. | |||
{{collapse/div|#Details}} | |||
<syntaxhighlight lang="shell" line="1" class="mlw-shell-gray"> | |||
sudo mkdir DocumentServer/etc | |||
sudo docker cp onlyoffice-docs:/etc/onlyoffice DocumentServer/etc | |||
sudo docker cp onlyoffice-docs:/etc/supervisor DocumentServer/etc | |||
</syntaxhighlight> | |||
Now we can stop and prune the container. | |||
<syntaxhighlight lang="shell" line="1" class="mlw-shell-gray"> | |||
docker stop onlyoffice-docs | |||
docker container prune | |||
</syntaxhighlight> | |||
Now create new container and attach the directories with the configuration files as volumes. | |||
<syntaxhighlight lang="shell" line="1" class="mlw-shell-gray"> | |||
sudo docker run -i -t -d -p 8081:80 --restart=always \ | |||
-v "$PWD/DocumentServer/logs:/var/log/onlyoffice" \ | |||
-v "$PWD/DocumentServer/data:/var/www/onlyoffice/Data" \ | |||
-v "$PWD/DocumentServer/lib:/var/lib/onlyoffice" \ | |||
-v "$PWD/DocumentServer/db:/var/lib/postgresql" \ | |||
-v "$PWD/DocumentServer/usr/share/fonts:/usr/share/fonts" \ | |||
-v "$PWD/DocumentServer/etc/onlyoffice:/etc/onlyoffice" \ | |||
-v "$PWD/DocumentServer/etc/supervisor:/etc/supervisor" \ | |||
--hostname docs --name onlyoffice-docs \ | |||
onlyoffice/documentserver:latest | |||
</syntaxhighlight> | |||
{{collapse/end}} | |||
'''Starting from version 7.2, JWT (JSON Web Token) is enabled by default.''' A random secret is generated automatically if a custom secret has not been added during installation. To obtain the default secret, run this command: | |||
<syntaxhighlight lang="shell" line="1" class=""> | |||
docker exec onlyoffice-docs /var/www/onlyoffice/documentserver/npm/json \ | |||
-f /etc/onlyoffice/documentserver/local.json 'services.CoAuthoring.secret.session.string' | |||
</syntaxhighlight> | |||
<syntaxhighlight lang="shell-session"> | |||
xd4f2PO5hdHJHjpV1NdD | |||
</syntaxhighlight> | |||
You can replace the default secret with a custom key using Docker env. More information about JWT in the [https://api.onlyoffice.com/editors/signature/ documentation]. Once again, in order to make the JWT persistent you need to provide it via Docker as environment variable - this will be done within the next section. | |||
'''Finally.''' Stop and prune the container, because in the next section we will create a Docker-compose configuration file. | |||
<syntaxhighlight lang="shell" line="1" class=""> | |||
docker stop onlyoffice-docs | |||
docker container prune | |||
</syntaxhighlight> | |||
=== Manage an OnlyOffice container by Docker-compose === | |||
Create the <code>docker-compose.yaml</code> file. Tweak the value of the host port <code>8081</code>, and the time zone <code>TZ</code> if it is needed. The most important thing is to set an unique value for <code>JWT_SECRET</code>, thus the JWT will become persistent.<syntaxhighlight lang="shell" line="1"> | |||
nano docker-compose.yaml | |||
</syntaxhighlight> | |||
<syntaxhighlight lang="yaml" line="1" highlight="12,14,15"> | |||
# https://hub.docker.com/r/onlyoffice/documentserver/ | |||
# https://github.com/ONLYOFFICE/onlyoffice-owncloud/issues/108 | |||
version: "3.9" | |||
services: | |||
onlyoffice-docs: | |||
container_name: onlyoffice-docs | |||
image: onlyoffice/documentserver:latest | |||
hostname: docs | |||
#network_mode: host | |||
ports: | |||
- "8081:80/tcp" | |||
environment: | |||
TZ: 'Europe/Sofia' | |||
JWT_SECRET: "xd4f2PO5hdHJHjpV1NdD" | |||
# Volumes store your data between container upgrades | |||
volumes: | |||
- "./DocumentServer/logs:/var/log/onlyoffice" | |||
- "./DocumentServer/data:/var/www/onlyoffice/Data" | |||
- "./DocumentServer/lib:/var/lib/onlyoffice" | |||
- "./DocumentServer/db:/var/lib/postgresql" | |||
- "./DocumentServer/usr/share/fonts:/usr/share/fonts" | |||
- "./DocumentServer/etc/onlyoffice:/etc/onlyoffice" | |||
- "./DocumentServer/etc/supervisor:/etc/supervisor" | |||
restart: unless-stopped | |||
volumes: | |||
DocumentServer: | |||
</syntaxhighlight>Download the Docker images and run the container in detached (persistent) mode.<syntaxhighlight lang="shell" line="1"> | |||
docker-compose up -d | |||
</syntaxhighlight>Open the OnlyOffice document server via the browser. Note the host port <code>8081</code> must be open (for you) within the host's firewall.<syntaxhighlight lang="bash"> | |||
http://<host-ip>:8081/welcome/ | |||
</syntaxhighlight> | |||
=== Add Custom Fonts === | |||
Here is how to install Microsoft Segoe UI font family, but after the first step the setup process is identical. <syntaxhighlight lang="shell" line="1" class="code-continue mlw-shell-gray"> | |||
cd /home/docker/onlyoffice | |||
</syntaxhighlight><syntaxhighlight lang="shell" line="1"> | </syntaxhighlight><syntaxhighlight lang="shell" line="1"> | ||
FONTS_DIR="." FC_CACHE="false" \ | |||
bash <(curl -s https://raw.githubusercontent.com/metalevel-tech/segoe-ui-linux/update/install.sh) | |||
< | |||
</syntaxhighlight> | </syntaxhighlight> | ||
Here starts the actual deployment. | |||
<syntaxhighlight lang="shell" line="1" class="code-continue"> | |||
sudo mv Microsoft/ DocumentServer/usr/share/fonts/ | |||
sudo chown -R root:root DocumentServer/usr/share/fonts/Microsoft/ | |||
docker exec -it onlyoffice-docs /usr/bin/documentserver-generate-allfonts.sh | |||
</syntaxhighlight> | </syntaxhighlight> | ||
<syntaxhighlight lang="shell" line="1" class="code-continue mlw-shell-gray"> | |||
docker-compose down | |||
docker-compose up -d | |||
</syntaxhighlight>Then you need to flush the cache of your browser, at least the cached files and hard reload the window where your NextCloud is opened. Then try to edit some file and check the list of the available fonts. | |||
== Apache2 HTTPS Reverse Proxy == | |||
It is possible to set-up OnlyOffice to use HTTPS and certain FQDN through its configuration. However in this section i described how to create Apache2 Reverse proxy that will handle this. | |||
First, test whether the necessary Apache2 modules are enabled. Below is show the list of the modules retired for this set-up. | |||
<syntaxhighlight lang="shell" line="1"> | |||
sudo apache2ctl -M | grep -E 'auth[nz]_core|unixd|proxy|headers|setenvif' | sudo apache2ctl -M | grep -E 'auth[nz]_core|unixd|proxy|headers|setenvif' | ||
</syntaxhighlight><syntaxhighlight lang="bash"> | </syntaxhighlight><syntaxhighlight lang="bash"> | ||
| Line 54: | Line 163: | ||
proxy_wstunnel_module (shared) # Required | proxy_wstunnel_module (shared) # Required | ||
setenvif_module (shared) # Required | setenvif_module (shared) # Required | ||
</syntaxhighlight> | </syntaxhighlight>Then setup a new virtual host as follow and restart Apache2. Note in this scenario you need a valid SSL/TLS certificate. In my case I'm using Let's encrypt wildcard certificate for the base domain where the instances of NextCloud and OnlyOffice are installed.<syntaxhighlight lang="shell" line="1"> | ||
sudo nano /etc/apache2/sites-enabled/docs.example.com.conf | sudo nano /etc/apache2/sites-enabled/docs.example.com.conf | ||
</syntaxhighlight><syntaxhighlight lang="apacheconf" line="1"> | </syntaxhighlight><syntaxhighlight lang="apacheconf" line="1" class="mlw-pre-max-height-320"> | ||
Define docs_base_fqdn example.com | |||
Define docs_fqdn docs.example.com | |||
Define docs_srvr 127.0.0.1 | |||
Define docs_port 8081 | |||
Define docs_doc_root "/var/www/${docs_fqdn}" | |||
<VirtualHost *:80> | <VirtualHost *:80> | ||
ServerName | ServerName ${docs_fqdn} | ||
ServerAdmin admin@ | ServerAdmin admin@${docs_base_fqdn} | ||
Redirect permanent "/" "https:// | |||
ErrorLog ${APACHE_LOG_DIR}/${docs_fqdn}.error.log | |||
CustomLog ${APACHE_LOG_DIR}/${docs_fqdn}.access.log combined | |||
# Redirect Requests to HTTPS | |||
Redirect permanent "/" "https://${docs_fqdn}/" | |||
</VirtualHost> | </VirtualHost> | ||
<IfModule mod_ssl.c> | <IfModule mod_ssl.c> | ||
<VirtualHost _default_:443> | <VirtualHost _default_:443> | ||
ServerName | ServerName ${docs_fqdn} | ||
ServerAdmin admin@ | ServerAdmin admin@${docs_base_fqdn} | ||
ErrorLog ${APACHE_LOG_DIR}/${docs_fqdn}.error.log | |||
CustomLog ${APACHE_LOG_DIR}/${docs_fqdn}.access.log combined | |||
<IfModule http2_module> | |||
# https://httpd.apache.org/docs/2.4/mod/mod_http2.html | |||
# https://httpd.apache.org/docs/2.4/howto/http2.html | |||
Protocols h2 h2c http/1.1 | |||
#ProtocolsHonorOrder Off | |||
#H2Direct on | |||
H2Upgrade on | |||
H2Push on | |||
# Default Priority Rule: | |||
# H2PushPriority * After 16 | |||
# More complex ruleset: | |||
H2PushPriority * after | |||
H2PushPriority text/css before | |||
H2PushPriority image/jpg after 32 | |||
H2PushPriority image/jpeg after 32 | |||
H2PushPriority image/png after 32 | |||
H2PushPriority application/javascript interleaved | |||
<LocationMatch "^.*$"> | |||
# Header add Link "</example.png>; rel=preload; as=image" | |||
# Header add Link "</style.css>; rel=preload; as=style" | |||
# Header add Link "</script.js>; rel=preload; as=script" | |||
</LocationMatch> | |||
# From apache2/mods-available/http2.conf | |||
# Since mod_http2 doesn't support the mod_logio module (which provide the %O format), | |||
# you may want to change your LogFormat directive as follow: | |||
LogFormat "%v:%p %h %l %u %t \"%r\" %>s %B \"%{Referer}i\" \"%{User-Agent}i\"" vhost_combined | |||
LogFormat "%h %l %u %t \"%r\" %>s %B \"%{Referer}i\" \"%{User-Agent}i\"" combined | |||
LogFormat "%h %l %u %t \"%r\" %>s %B" common | |||
</IfModule> | </IfModule> | ||
SSLEngine on | |||
#SSLCertificateFile /etc/letsencrypt/live/${docs_base_fqdn}/cert.pem | |||
#SSLCertificateKeyFile /etc/letsencrypt/live/${docs_base_fqdn}/privkey.pem | |||
#SSLCertificateChainFile /etc/letsencrypt/live/${docs_base_fqdn}/chain.pem | |||
SSLCertificateFile /etc/letsencrypt/live/${docs_base_fqdn}/fullchain.pem | |||
SSLCertificateKeyFile /etc/letsencrypt/live/${docs_base_fqdn}/privkey.pem | |||
Include /etc/letsencrypt/options-ssl-apache.conf | |||
SetEnvIf Host "^(.*)$" THE_HOST=$1 | SetEnvIf Host "^(.*)$" THE_HOST=$1 | ||
Header edit Set-Cookie ^(.*)$ "$1; HttpOnly; Secure" | Header edit Set-Cookie ^(.*)$ "$1; HttpOnly; Secure" | ||
RequestHeader setifempty X-Forwarded-Proto https | RequestHeader setifempty X-Forwarded-Proto https | ||
RequestHeader setifempty X-Forwarded-Host %{THE_HOST}e | RequestHeader setifempty X-Forwarded-Host %{THE_HOST}e | ||
# Reference about OnlyOffice Proxy settings | |||
# https://github.com/ONLYOFFICE/onlyoffice-owncloud/issues/108 | |||
ProxyAddHeaders Off | ProxyAddHeaders Off | ||
<Location "/"> | |||
ProxyPass "http://${docs_srvr}:${docs_port}/" | |||
ProxyPassReverse "http://${docs_srvr}:${docs_port}/" | |||
</Location> | |||
ProxyPassMatch (.*)(\/websocket)$ "ws:// | ProxyPassMatch (.*)(\/websocket)$ "ws://${docs_srvr}:${docs_port}/$1$2" | ||
# DocumentRoot "${docs_doc_root}" | |||
# <Directory "${docs_doc_root}"> | |||
# DirectoryIndex index.php index.html hello.html | |||
# Require all granted | |||
# #Options None FollowSymLinks MultiViews | |||
# Options None FollowSymLinks | |||
# # AllowOverride None | |||
# AllowOverride All | |||
# <IfModule security2_module> | |||
# #SecRuleEngine Off | |||
# </IfModule> | |||
# </Directory> | |||
# Limit the acces to the URIs /, /welcome, /example, /healthcheck | |||
<ifModule mod_rewrite.c> | |||
RewriteEngine On | |||
RewriteCond "%{REMOTE_ADDR}" "!^(172\.16\.[0-9]{1,3}\.[0-9]{1,3}|0\.0\.0\.0|127\.0\.0\.[0-9]{1,3})$" | |||
RewriteCond "%{REQUEST_URI}" "^/(welcome.*$|example.*$|healthcheck.*$|$)" | |||
RewriteRule "^(.*)$" https://cloud.example.com/? [L,R=307] | |||
</ifModule> | |||
</VirtualHost> | </VirtualHost> | ||
</IfModule> | </IfModule> | ||
</syntaxhighlight> | </syntaxhighlight> | ||
== Setup NextCloud OnlyOffice App == | |||
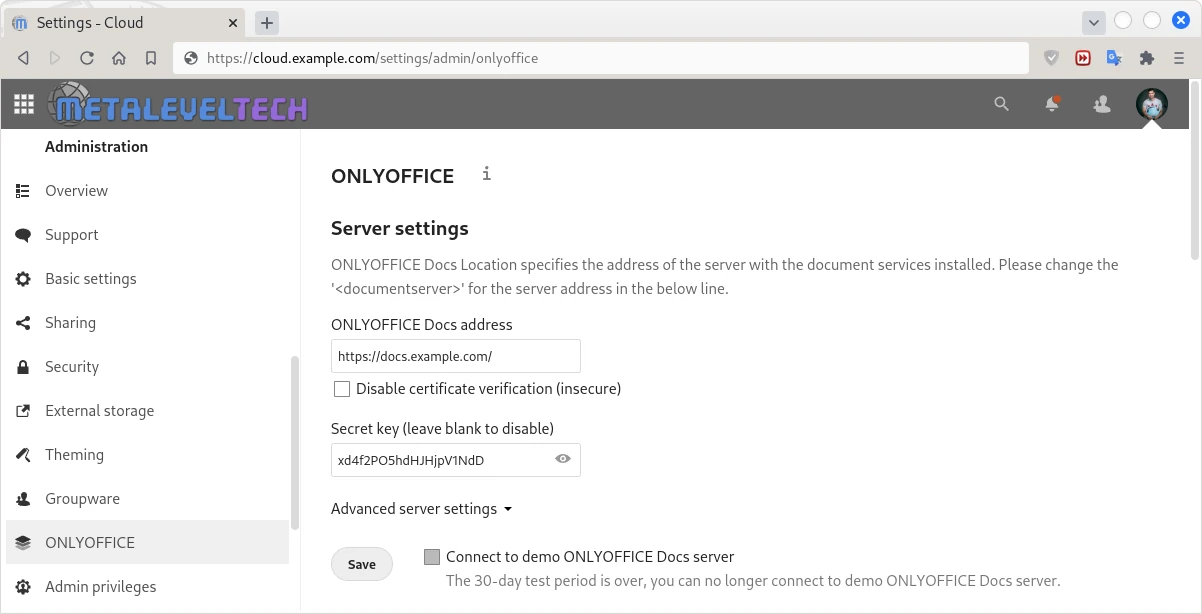
As it is shown at {{Media-cite|sf|1}}, within the NextCloud OnlyOffice App we need to provide {{Pti|s=1|i=1|c=blue}} the address of the document server and {{Pti|s=1|i=2|c=blue}} the JWT key. | |||
{{Sform | |||
| n = 1 | |||
| image = NextCloud-OnlyOfficeSettings.webp | |||
| m = {{pt|s=1|i=1|c=blue|a=90|x=584|y=275|z=1}} | |||
{{pt|s=1|i=2|c=blue|a=90|x=584|y=170|z=1}} | |||
| s = 1 | |||
}} | |||
== References == | == References == | ||
* [https://helpcenter.onlyoffice.com/installation/docs-community-install-docker.aspx#Installing | * OnlyOffice Help Center: [https://helpcenter.onlyoffice.com/installation/docs-community-install-docker.aspx#Installing Installing ONLYOFFICE Docs Community Edition for Docker on a local server] | ||
* [https://hub.docker.com/r/onlyoffice/documentserver | * OnlyOffice Help Center: [https://test-helpcenter.onlyoffice.com/installation/docs-configure-jwt.aspx Configuring JWT for ONLYOFFICE Docs] | ||
* [https://github.com/ONLYOFFICE/onlyoffice-nextcloud | * Docker Hub: [https://hub.docker.com/r/onlyoffice/documentserver onlyoffice/documentserver] | ||
* [https://github.com/ONLYOFFICE/onlyoffice-nextcloud/releases | * GitHub: [https://github.com/ONLYOFFICE/onlyoffice-nextcloud ONLYOFFICE/onlyoffice-nextcloud] | ||
* [https://api.onlyoffice.com/editors/nextcloud | * GitHub: [https://github.com/ONLYOFFICE/onlyoffice-nextcloud/releases ONLYOFFICE/onlyoffice-nextcloud/releases] | ||
* [https://github.com/ONLYOFFICE/onlyoffice-nextcloud/issues/297 <nowiki> | * OnlyOffice Api Docs: [https://api.onlyoffice.com/editors/nextcloud Nextcloud ONLYOFFICE integration app] | ||
* [https:// | * GitHub: [https://github.com/ONLYOFFICE/onlyoffice-nextcloud/issues/297 <nowiki>ONLYOFFICE/onlyoffice-nextcloud/issues/[Can't connect do document server after update to NC19 #297]</nowiki>] | ||
* Docker Manuals: [https://docs.docker.com/compose/gettingstarted/ Get started with Docker Compose] | [https://docs.docker.com/compose/envvars-precedence/ Environment variables precedence] | |||
* Docker Reference Manual: [https://docs.docker.com/compose/compose-file/compose-file-v3/ Compose file > Legacy > Version 3] | |||
* Docker Guides: [https://docs.docker.com/storage/volumes/#use-a-volume-with-docker-compose Manage application data > Volumes > Use a volume with docker-compose] | |||
* Stack Overflow: [https://stackoverflow.com/a/22050116/6543935 Docker - Copying files from Docker container to host] | |||
* OnlyOffice Forum: [https://helpcenter.onlyoffice.com/installation/docs-community-install-fonts-linux.aspx Adding <u>'''fonts'''</u> to ONLYOFFICE Docs] | |||
* OnlyOffice Forum: [https://forum.onlyoffice.com/t/adding-new-fonts-to-onlyoffice-docuserver-installed-from-snap/2137 Adding new <u>fonts</u> to ONLYOFFICE docuserver installed from Snap] | |||
* GitHub: [https://github.com/ONLYOFFICE/onlyoffice-nextcloud/issues/238 Fail to add new <u>fonts</u>] | |||
<noinclude> | |||
<div id='devStage'> | |||
{{devStage | |||
| Прндл = Web Servers | |||
| Прндл1 = Linux Server | |||
| Прндл2 = Containers | |||
| Стадий = 6 | |||
| Фаза = Утвърждаване | |||
| Статус = Утвърден | |||
| ИдтПт = Spas | |||
| РзбПт = Spas | |||
| АвтПт = Spas | |||
| УтвПт = {{REVISIONUSER}} | |||
| ИдтДт = 1.08.2022 | |||
| РзбДт = 28.09.2022 | |||
| АвтДт = 18.02.2023 | |||
| УтвДт = {{Today}} | |||
| ИдтРв = [[Special:Permalink/29570|29570]] | |||
| РзбРв = [[Special:Permalink/32071|32071]] | |||
| АвтРв = [[Special:Permalink/32273|32273]] | |||
| РзАРв = [[Special:Permalink/31868|31868]] | |||
| УтвРв = {{REVISIONID}} | |||
| РзУРв = [[Special:Permalink/31870|31870]] | |||
}} | |||
</div> | |||
</noinclude> | |||
Latest revision as of 12:46, 18 February 2023
Here is a short step-by-step manual: How to setup OnlyOffice Document Server Docker container and proxy it by Apache2 for usage via NextCloud.
Install Docker
According to the Docker and Docker-compose installation read the guide Docker Basic Setup.
Setup the OnlyOffice Docker Container
Create a directory where the configuration file docker-compose.yaml and the persistent volumes will live.
mkdir /home/docker/onlyoffice
cd /home/docker/onlyoffice
Pull the Docker images and run an OnlyOffice container for a first time
sudo docker run -i -t -d -p 8081:80 --restart=always" \
-v "$PWD/DocumentServer/logs:/var/log/onlyoffice" \
-v "$PWD/DocumentServer/data:/var/www/onlyoffice/Data" \
-v "$PWD/DocumentServer/lib:/var/lib/onlyoffice" \
-v "$PWD/DocumentServer/db:/var/lib/postgresql" \
-v "$PWD/DocumentServer/usr/share/fonts:/usr/share/fonts" \
--hostname docs --name onlyoffice-docs \
onlyoffice/documentserver:latest
Test whether it works. At this point the OnlyOffice document server must be accessible the browser, probably you maybe need to wait about 10 seconds before it become accessible. Note the host port 8081 must be open (for you) within the host's firewall.
http://<host-ip>:8081/welcome/
Enable the integrated test examples.
docker exec onlyoffice-docs supervisorctl start ds:example
docker exec onlyoffice-docs sed 's,autostart=false,autostart=true,' -i /etc/supervisor/conf.d/ds-example.conf
Now you can access the examples at the following address.
http://<host-ip>:8081/example/
Export the configuration files. For some reason the configuration files cannot be exported via the volume option as this is done above for some other directories. So, if we need that, we need first to copy them manually.
sudo mkdir DocumentServer/etc
sudo docker cp onlyoffice-docs:/etc/onlyoffice DocumentServer/etc
sudo docker cp onlyoffice-docs:/etc/supervisor DocumentServer/etc
Now we can stop and prune the container.
docker stop onlyoffice-docs
docker container prune
Now create new container and attach the directories with the configuration files as volumes.
sudo docker run -i -t -d -p 8081:80 --restart=always \
-v "$PWD/DocumentServer/logs:/var/log/onlyoffice" \
-v "$PWD/DocumentServer/data:/var/www/onlyoffice/Data" \
-v "$PWD/DocumentServer/lib:/var/lib/onlyoffice" \
-v "$PWD/DocumentServer/db:/var/lib/postgresql" \
-v "$PWD/DocumentServer/usr/share/fonts:/usr/share/fonts" \
-v "$PWD/DocumentServer/etc/onlyoffice:/etc/onlyoffice" \
-v "$PWD/DocumentServer/etc/supervisor:/etc/supervisor" \
--hostname docs --name onlyoffice-docs \
onlyoffice/documentserver:latest
Starting from version 7.2, JWT (JSON Web Token) is enabled by default. A random secret is generated automatically if a custom secret has not been added during installation. To obtain the default secret, run this command:
docker exec onlyoffice-docs /var/www/onlyoffice/documentserver/npm/json \
-f /etc/onlyoffice/documentserver/local.json 'services.CoAuthoring.secret.session.string'
xd4f2PO5hdHJHjpV1NdD
You can replace the default secret with a custom key using Docker env. More information about JWT in the documentation. Once again, in order to make the JWT persistent you need to provide it via Docker as environment variable – this will be done within the next section.
Finally. Stop and prune the container, because in the next section we will create a Docker-compose configuration file.
docker stop onlyoffice-docs
docker container prune
Manage an OnlyOffice container by Docker-compose
Create the docker-compose.yaml file. Tweak the value of the host port 8081, and the time zone TZ if it is needed. The most important thing is to set an unique value for JWT_SECRET, thus the JWT will become persistent.
nano docker-compose.yaml
# https://hub.docker.com/r/onlyoffice/documentserver/
# https://github.com/ONLYOFFICE/onlyoffice-owncloud/issues/108

version: "3.9"
services:
  onlyoffice-docs:
    container_name: onlyoffice-docs
    image: onlyoffice/documentserver:latest
    hostname: docs
    #network_mode: host
    ports:
      - "8081:80/tcp"
    environment:
      TZ: 'Europe/Sofia'
      JWT_SECRET: "xd4f2PO5hdHJHjpV1NdD"
    # Volumes store your data between container upgrades
    volumes:
      - "./DocumentServer/logs:/var/log/onlyoffice"
      - "./DocumentServer/data:/var/www/onlyoffice/Data"
      - "./DocumentServer/lib:/var/lib/onlyoffice"
      - "./DocumentServer/db:/var/lib/postgresql"
      - "./DocumentServer/usr/share/fonts:/usr/share/fonts"
      - "./DocumentServer/etc/onlyoffice:/etc/onlyoffice"
      - "./DocumentServer/etc/supervisor:/etc/supervisor"
    restart: unless-stopped

volumes:
    DocumentServer:
Download the Docker images and run the container in detached (persistent) mode.
docker-compose up -d
Open the OnlyOffice document server via the browser. Note the host port 8081 must be open (for you) within the host's firewall.
http://<host-ip>:8081/welcome/
Add Custom Fonts
Here is how to install Microsoft Segoe UI font family, but after the first step the setup process is identical.
cd /home/docker/onlyoffice
FONTS_DIR="." FC_CACHE="false" \
bash <(curl -s https://raw.githubusercontent.com/metalevel-tech/segoe-ui-linux/update/install.sh)
Here starts the actual deployment.
sudo mv Microsoft/ DocumentServer/usr/share/fonts/
sudo chown -R root:root DocumentServer/usr/share/fonts/Microsoft/
docker exec -it onlyoffice-docs /usr/bin/documentserver-generate-allfonts.sh
docker-compose down
docker-compose up -d
Then you need to flush the cache of your browser, at least the cached files and hard reload the window where your NextCloud is opened. Then try to edit some file and check the list of the available fonts.
Apache2 HTTPS Reverse Proxy
It is possible to set-up OnlyOffice to use HTTPS and certain FQDN through its configuration. However in this section i described how to create Apache2 Reverse proxy that will handle this.
First, test whether the necessary Apache2 modules are enabled. Below is show the list of the modules retired for this set-up.
sudo apache2ctl -M | grep -E 'auth[nz]_core|unixd|proxy|headers|setenvif'
 unixd_module (static)          # Required
 authn_core_module (shared)     # Required
 authz_core_module (shared)     # Required
 headers_module (shared)        # Required
 proxy_module (shared)          # Required
 proxy_fcgi_module (shared)
 proxy_http_module (shared)     # Required
 proxy_http2_module (shared)
 proxy_wstunnel_module (shared) # Required
 setenvif_module (shared)       # Required
Then setup a new virtual host as follow and restart Apache2. Note in this scenario you need a valid SSL/TLS certificate. In my case I'm using Let's encrypt wildcard certificate for the base domain where the instances of NextCloud and OnlyOffice are installed.
sudo nano /etc/apache2/sites-enabled/docs.example.com.conf
Define docs_base_fqdn example.com
Define docs_fqdn docs.example.com
Define docs_srvr 127.0.0.1
Define docs_port 8081
Define docs_doc_root "/var/www/${docs_fqdn}"

<VirtualHost *:80>
    ServerName ${docs_fqdn}
    ServerAdmin admin@${docs_base_fqdn}

    ErrorLog ${APACHE_LOG_DIR}/${docs_fqdn}.error.log
    CustomLog ${APACHE_LOG_DIR}/${docs_fqdn}.access.log combined

    # Redirect Requests to HTTPS
    Redirect permanent "/" "https://${docs_fqdn}/"
</VirtualHost>

<IfModule mod_ssl.c>
<VirtualHost _default_:443>
    ServerName ${docs_fqdn}
    ServerAdmin admin@${docs_base_fqdn}

    ErrorLog ${APACHE_LOG_DIR}/${docs_fqdn}.error.log
    CustomLog ${APACHE_LOG_DIR}/${docs_fqdn}.access.log combined

    <IfModule http2_module>
        # https://httpd.apache.org/docs/2.4/mod/mod_http2.html
        # https://httpd.apache.org/docs/2.4/howto/http2.html

        Protocols h2 h2c http/1.1
        #ProtocolsHonorOrder Off
        #H2Direct on
        H2Upgrade on

        H2Push on
        # Default Priority Rule:
        # H2PushPriority *                      After 16
        # More complex ruleset:
        H2PushPriority *                        after
        H2PushPriority text/css                 before
        H2PushPriority image/jpg                after 32
        H2PushPriority image/jpeg               after 32
        H2PushPriority image/png                after 32
        H2PushPriority application/javascript   interleaved
        <LocationMatch "^.*$">
            # Header add Link "</example.png>; rel=preload; as=image"
            # Header add Link "</style.css>; rel=preload; as=style"
            # Header add Link "</script.js>; rel=preload; as=script"
        </LocationMatch>

        # From apache2/mods-available/http2.conf
        # Since mod_http2 doesn't support the mod_logio module (which provide the %O format),
        # you may want to change your LogFormat directive as follow:
		LogFormat "%v:%p %h %l %u %t \"%r\" %>s %B \"%{Referer}i\" \"%{User-Agent}i\"" vhost_combined
        LogFormat "%h %l %u %t \"%r\" %>s %B \"%{Referer}i\" \"%{User-Agent}i\"" combined
        LogFormat "%h %l %u %t \"%r\" %>s %B" common
    </IfModule>

    SSLEngine on
    #SSLCertificateFile /etc/letsencrypt/live/${docs_base_fqdn}/cert.pem
    #SSLCertificateKeyFile /etc/letsencrypt/live/${docs_base_fqdn}/privkey.pem
    #SSLCertificateChainFile /etc/letsencrypt/live/${docs_base_fqdn}/chain.pem
    SSLCertificateFile /etc/letsencrypt/live/${docs_base_fqdn}/fullchain.pem
    SSLCertificateKeyFile /etc/letsencrypt/live/${docs_base_fqdn}/privkey.pem
    Include /etc/letsencrypt/options-ssl-apache.conf

    SetEnvIf Host "^(.*)$" THE_HOST=$1

    Header edit Set-Cookie ^(.*)$ "$1; HttpOnly; Secure"
    RequestHeader setifempty X-Forwarded-Proto https
    RequestHeader setifempty X-Forwarded-Host %{THE_HOST}e

    # Reference about OnlyOffice Proxy settings
    # https://github.com/ONLYOFFICE/onlyoffice-owncloud/issues/108
    ProxyAddHeaders Off
    <Location "/">
        ProxyPass "http://${docs_srvr}:${docs_port}/"
        ProxyPassReverse "http://${docs_srvr}:${docs_port}/"
    </Location>

    ProxyPassMatch (.*)(\/websocket)$ "ws://${docs_srvr}:${docs_port}/$1$2"

    # DocumentRoot "${docs_doc_root}"
    # <Directory "${docs_doc_root}">
    #     DirectoryIndex index.php index.html hello.html
    #     Require all granted
    #     #Options None FollowSymLinks MultiViews
    #     Options None FollowSymLinks
    #     # AllowOverride None
    #     AllowOverride All
    #     <IfModule security2_module>
    #         #SecRuleEngine Off
    #     </IfModule>
    # </Directory>

    # Limit the acces to the URIs  /, /welcome, /example, /healthcheck
    <ifModule mod_rewrite.c>
        RewriteEngine On
        RewriteCond "%{REMOTE_ADDR}" "!^(172\.16\.[0-9]{1,3}\.[0-9]{1,3}|0\.0\.0\.0|127\.0\.0\.[0-9]{1,3})$"
        RewriteCond "%{REQUEST_URI}" "^/(welcome.*$|example.*$|healthcheck.*$|$)"
        RewriteRule "^(.*)$" https://cloud.example.com/? [L,R=307]
    </ifModule>
</VirtualHost>
</IfModule>
Setup NextCloud OnlyOffice App
As it is shown at Screen 1, within the NextCloud OnlyOffice App we need to provide 1 the address of the document server and 2 the JWT key.

References
- OnlyOffice Help Center: Installing ONLYOFFICE Docs Community Edition for Docker on a local server
- OnlyOffice Help Center: Configuring JWT for ONLYOFFICE Docs
- Docker Hub: onlyoffice/documentserver
- GitHub: ONLYOFFICE/onlyoffice-nextcloud
- GitHub: ONLYOFFICE/onlyoffice-nextcloud/releases
- OnlyOffice Api Docs: Nextcloud ONLYOFFICE integration app
- GitHub: ONLYOFFICE/onlyoffice-nextcloud/issues/[Can't connect do document server after update to NC19 #297]
- Docker Manuals: Get started with Docker Compose | Environment variables precedence
- Docker Reference Manual: Compose file > Legacy > Version 3
- Docker Guides: Manage application data > Volumes > Use a volume with docker-compose
- Stack Overflow: Docker – Copying files from Docker container to host
- OnlyOffice Forum: Adding fonts to ONLYOFFICE Docs
- OnlyOffice Forum: Adding new fonts to ONLYOFFICE docuserver installed from Snap
- GitHub: Fail to add new fonts