Odoo 11 How to install: Difference between revisions
| Line 52: | Line 52: | ||
</syntaxhighlight> | </syntaxhighlight> | ||
The configuration file is: <code>/etc/odoo-server.conf</code>. | The configuration file is: <code>/etc/odoo-server.conf</code>. | ||
== Proceed the installation of ODOO through the web interface == | == Proceed the installation of ODOO through the web interface == | ||
{{media | {{media | ||
| n = 1 | | n = 1 | ||
| Line 61: | Line 60: | ||
| sz = 1200 | | sz = 1200 | ||
}} | }} | ||
== Reverse proxy == | == Reverse proxy == | ||
In order to access your Odoo application only by using your domain name, without the port number in the URL, or through HTTPS, you need to set up a reverse proxy: | In order to access your Odoo application only by using your domain name, without the port number in the URL, or through HTTPS, you need to set up a reverse proxy: | ||
Revision as of 09:33, 9 August 2022
Odoo pretends to be all-in-one management software. Here is presented how to install and setup it to work over HTTPS. Here are presented two alternative methods of Odos's installation – from the GitHib project and from the repository:
Install Odoo from the repository
This should be the preferable way. Install the dependencies, add the repository and its key, update the system and install the package:
sudo apt update && sudo apt install postgresql
wget -O - https://nightly.odoo.com/odoo.key | sudo apt-key add -
echo "deb http://nightly.odoo.com/11.0/nightly/deb/ ./" | sudo tee /etc/apt/sources.list.d/odoo.list
sudo apt update && sudo apt upgrade && sudo apt install odoo
With this configuration you can control the service by the commands:
sudo systemctl status odoo.service
sudo systemctl restart odoo.service
sudo systemctl start odoo.service
sudo systemctl stop odoo.service
The main configuration file is: /etc/odoo/odoo.conf.
Install Odoo from the GitHib project
- If you've followed 1.A skip this step – go to 2.
This section uses Yenthe V.G's installation scrip. I found this approach in the article: Install Odoo 11 on Ubuntu 16.04…. Download odoo_install.sh:
wget https://raw.githubusercontent.com/Yenthe666/InstallScript/11.0/odoo_install.sh
Edit odoo_install.sh and modify the parameters, under the section #fixed parameters:
OE_USERwill be the username for the system user, the default one isodoo.
- By default the script will create user's home directory
/<odoo user>. You could leave the following values as default, but I would prefer/home/<odoo user>:
OE_HOME="/home/$OE_USER"
OE_HOME_EXT="$OE_HOME/${OE_USER}-server"
INSTALL_WKHTMLTOPDFset to False if you do not want to install Wkhtmltopdf, if you want to install it you should set it toTrue.
OE_PORTis the port where Odoo should run on, for example8069.
OE_VERSIONis the Odoo version to install, for example11.0for Odoo V11.
IS_ENTERPRISEwill install the Enterprise version on top of 11.0 if you set it toTrue, set it toFalseif you want the community version of Odoo 11.
OE_SUPERADMINis the master password for this Odoo installation. The default pass isadmin.
Make odoo_install.sh executable and execute it as root:
chmod +x odoo_install.sh && sudo ./odoo_install.sh
You could control the application by the commands:
sudo /etc/init.d/odoo-server restart
sudo /etc/init.d/odoo-server start
sudo /etc/init.d/odoo-server stop
The configuration file is: /etc/odoo-server.conf.
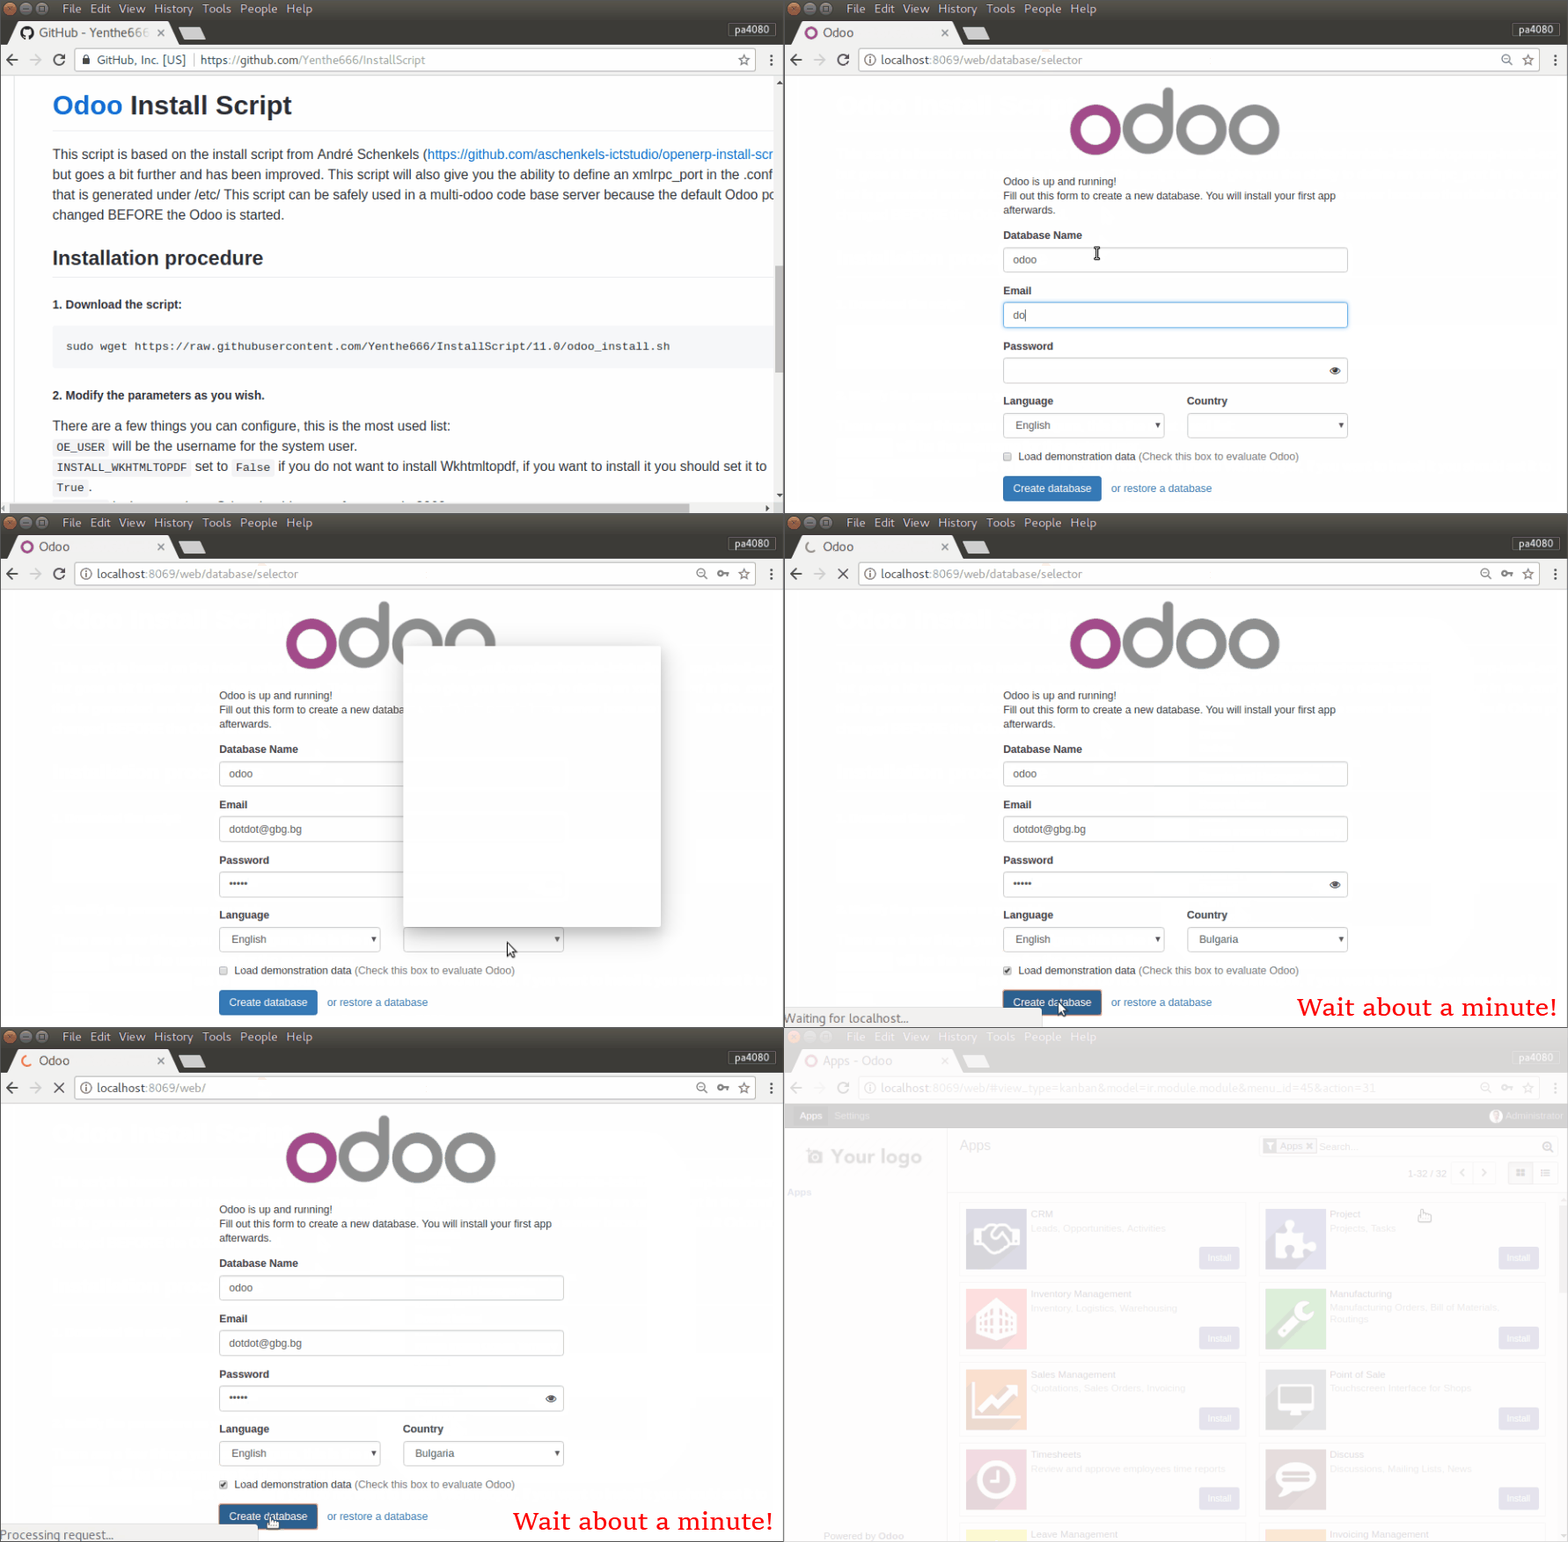
Proceed the installation of ODOO through the web interface
Reverse proxy
In order to access your Odoo application only by using your domain name, without the port number in the URL, or through HTTPS, you need to set up a reverse proxy:
- To use Apache as Reverse proxy – follow step 7 from the article File:How To Install Odoo 11 on Ubuntu 16.04 by Jeff Wilson at RoseHosting.pdf.
- See also Apache: Reverse Proxy Guide and the repository metalevel-tech/a2proxy at GitHub.
- To use Nginx as Reverse proxy – follow the Section HTTPS from the Odoo's documentation.
stunnel4also could be applicable…
