PVE Adopt a Native LXD/LXC: Difference between revisions
m Стадий: 6 [Фаза:Утвърждаване, Статус:Утвърден]; Категория:Proxmox |
m Text replacement - "mlw-continue" to "code-continue" |
||
| Line 4: | Line 4: | ||
== Export the Container == | == Export the Container == | ||
Go into the instance where the LXD is installed and create a backup of the LXC you want to clone. If the container is installed within LVM you need to mount the root filesystem somewhere and create the archive from inside the mount point. I will going to play the other scenario where the LXC is installed within a directory on Ubuntu 22.04. | Go into the instance where the LXD is installed and create a backup of the LXC you want to clone. If the container is installed within LVM you need to mount the root filesystem somewhere and create the archive from inside the mount point. I will going to play the other scenario where the LXC is installed within a directory on Ubuntu 22.04. | ||
<syntaxhighlight lang="shell" line="1" class="root-prompt | <syntaxhighlight lang="shell" line="1" class="root-prompt code-continue mlw-shell-gray"> | ||
lxc config show --expanded webserver | grep 'privileged' | lxc config show --expanded webserver | grep 'privileged' | ||
</syntaxhighlight> | </syntaxhighlight> | ||
<syntaxhighlight lang="bash" class="root-prompt | <syntaxhighlight lang="bash" class="root-prompt code-continue"> | ||
security.privileged: "false" | security.privileged: "false" | ||
</syntaxhighlight> | </syntaxhighlight> | ||
| Line 52: | Line 52: | ||
=== Create CT via CLI of PVE === | === Create CT via CLI of PVE === | ||
Gere is how to create <u>un</u>privileged container by using the command <code>[https://pve.proxmox.com/pve-docs/pct.1.html pct]</code>.<syntaxhighlight lang="shell" line="1" class="root-prompt | Gere is how to create <u>un</u>privileged container by using the command <code>[https://pve.proxmox.com/pve-docs/pct.1.html pct]</code>.<syntaxhighlight lang="shell" line="1" class="root-prompt code-continue mlw-shell-gray"> | ||
pveam list ssd-1TB | pveam list ssd-1TB | ||
</syntaxhighlight> | </syntaxhighlight> | ||
<syntaxhighlight lang="terraform" class="root-prompt | <syntaxhighlight lang="terraform" class="root-prompt code-continue"> | ||
NAME SIZE | NAME SIZE | ||
ssd-1TB:vztmpl/lxc-webserver.tar.gz 2541.03MB | ssd-1TB:vztmpl/lxc-webserver.tar.gz 2541.03MB | ||
| Line 69: | Line 69: | ||
--net0 name=eth0,hwaddr=64:6B:5C:36:48:E3,ip=172.16.17.177/24,gw=172.16.17.1,bridge=vmbr0 | --net0 name=eth0,hwaddr=64:6B:5C:36:48:E3,ip=172.16.17.177/24,gw=172.16.17.1,bridge=vmbr0 | ||
</syntaxhighlight> | </syntaxhighlight> | ||
<syntaxhighlight lang="terraform" class="root-prompt | <syntaxhighlight lang="terraform" class="root-prompt code-continue"> | ||
Formatting '/mnt/pve/ssd-1TB/images/177/vm-177-disk-0.raw', fmt=raw size=34359738368 preallocation=off | Formatting '/mnt/pve/ssd-1TB/images/177/vm-177-disk-0.raw', fmt=raw size=34359738368 preallocation=off | ||
Creating filesystem with 8388608 4k blocks and 2097152 inodes | Creating filesystem with 8388608 4k blocks and 2097152 inodes | ||
| Line 98: | Line 98: | ||
</syntaxhighlight>'''2.''' Depending on your LAN DHCP setup you may want manually set a static IP from the instance.<syntaxhighlight lang="shell" line="1"> | </syntaxhighlight>'''2.''' Depending on your LAN DHCP setup you may want manually set a static IP from the instance.<syntaxhighlight lang="shell" line="1"> | ||
sudo nano /etc/netplan/50-cloud-init.yaml # The name of your conf file culd be different | sudo nano /etc/netplan/50-cloud-init.yaml # The name of your conf file culd be different | ||
</syntaxhighlight><syntaxhighlight lang="yaml" class=" | </syntaxhighlight><syntaxhighlight lang="yaml" class="code-continue"> | ||
network: | network: | ||
version: 2 | version: 2 | ||
| Line 112: | Line 112: | ||
</syntaxhighlight><syntaxhighlight lang="shell" line="1"> | </syntaxhighlight><syntaxhighlight lang="shell" line="1"> | ||
sudo nano /etc/cloud/cloud.cfg.d/99-disable-network-config.cfg | sudo nano /etc/cloud/cloud.cfg.d/99-disable-network-config.cfg | ||
</syntaxhighlight><syntaxhighlight lang="yaml" class=" | </syntaxhighlight><syntaxhighlight lang="yaml" class="code-continue"> | ||
network: {config: disabled} | network: {config: disabled} | ||
</syntaxhighlight><syntaxhighlight lang="shell" line="1" class=" | </syntaxhighlight><syntaxhighlight lang="shell" line="1" class="code-continue"> | ||
sudo netplan apply | sudo netplan apply | ||
</syntaxhighlight><syntaxhighlight lang="shell" line="1" class=" | </syntaxhighlight><syntaxhighlight lang="shell" line="1" class="code-continue mlw-shell-gray"> | ||
sudo ip addr show eth0 | grep -w 'inet' | sudo ip addr show eth0 | grep -w 'inet' | ||
</syntaxhighlight> | </syntaxhighlight> | ||
<syntaxhighlight lang="terraform" class=" | <syntaxhighlight lang="terraform" class="code-continue"> | ||
inet 172.16.17.177/24 metric 100 brd 172.16.17.255 scope global dynamic eth0 | inet 172.16.17.177/24 metric 100 brd 172.16.17.255 scope global dynamic eth0 | ||
</syntaxhighlight>'''3.''' Finally you may want to remove some packages and <code>apt</code> repositories.<syntaxhighlight lang="shell" line="1" class=" | </syntaxhighlight>'''3.''' Finally you may want to remove some packages and <code>apt</code> repositories.<syntaxhighlight lang="shell" line="1" class="code-continue"> | ||
sudo rm /etc/apt/sources.list.d/droplet-agent.list | sudo rm /etc/apt/sources.list.d/droplet-agent.list | ||
sudo apt remove droplet-agent droplet-agent-keyring | sudo apt remove droplet-agent droplet-agent-keyring | ||
Latest revision as of 08:28, 26 September 2022
Converting an LXD/LXC to a ProxmoxVE/LXC is pretty easy, because the are (almost) the same thing.
Export the Container
Go into the instance where the LXD is installed and create a backup of the LXC you want to clone. If the container is installed within LVM you need to mount the root filesystem somewhere and create the archive from inside the mount point. I will going to play the other scenario where the LXC is installed within a directory on Ubuntu 22.04.
lxc config show --expanded webserver | grep 'privileged'
security.privileged: "false"
cd /var/snap/lxd/common/lxd/storage-pools/default/containers/webserver/rootfs
tar --exclude=dev --exclude=sys --exclude=proc --exclude=tmp/* \
-czvf /home/backups/lxc-webserver.tar.gz ./
Note in the commands above:
webserveris the name of the container.lxc-webserver.tar.gzis the name of the archive file of that container.
In this case the backup is created while the container is running, otherwise the –exclude options may not be needed. In addition I would say using this approach is much easier than using a native LXD/LXC backup, where we need to extract only the rootfs/ and archive it again.
Transfer the Container to the PVE Instance
Copy the backup of an LXD/LXC to a ProxmoxVE's template directory within its storage. In my case I'm using a command as the shown below.
rsync --progress \
remote.host:/home/backups/lxc-webserver.tar.gz \
/mnt/pve/ssd-1TB/template/cache/
Note in the commands above:
ssd-1TBis one of my PVE's storage devices A where Container templates B are allowed as Content type.
Create CT within ProxmoxVE
At this point we can use the backup file lxc-webserver.tar.gz as container template C. And we have two potions: 1) to use WEB GUI or 2) to use the CLI of PVE.
Create CT via WEB GUI of PVE
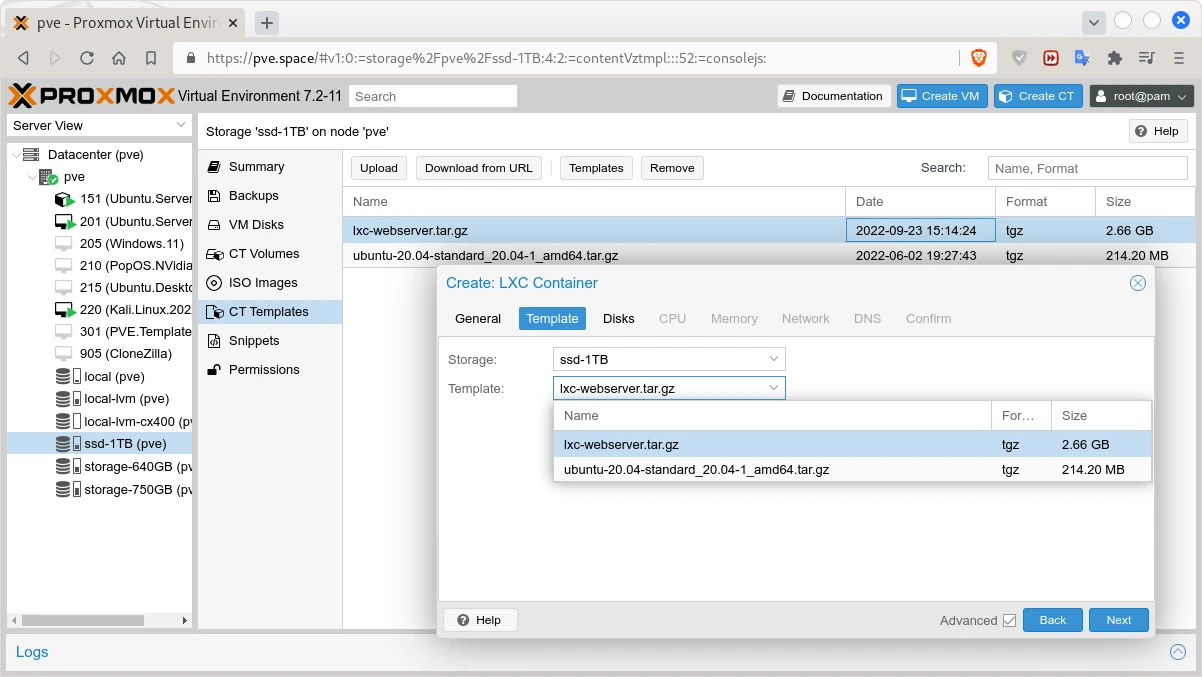
It is pretty easy to use the GUI but it can't be used for scripting. The specific steps are shown at Screen 1.

Create CT via CLI of PVE
Gere is how to create unprivileged container by using the command pct.
pveam list ssd-1TB
NAME                                                         SIZE
ssd-1TB:vztmpl/lxc-webserver.tar.gz                          2541.03MB
ssd-1TB:vztmpl/ubuntu-20.04-standard_20.04-1_amd64.tar.gz    204.28MB
pct create 177 ssd-1TB:vztmpl/lxc-webserver.tar.gz --password "SuperStrong:)" \
--description "LXC migrated" --hostname "webserver" --ostype "ubuntu" \
--cores 2 --memory 2048 --swap 512 --rootfs ssd-1TB:32 \
--features fuse=1,nesting=1 --unprivileged 1 \
--nameserver 172.16.17.151,8.8.8.8 \
--net0 name=eth0,hwaddr=64:6B:5C:36:48:E3,ip=172.16.17.177/24,gw=172.16.17.1,bridge=vmbr0
Formatting '/mnt/pve/ssd-1TB/images/177/vm-177-disk-0.raw', fmt=raw size=34359738368 preallocation=off
Creating filesystem with 8388608 4k blocks and 2097152 inodes
Filesystem UUID: f7f1fa30-0906-482c-9b5d-afc9be42533f
Superblock backups stored on blocks:
	32768, 98304, 163840, 229376, 294912, 819200, 884736, 1605632, 2654208,
	4096000, 7962624
extracting archive '/mnt/pve/ssd-1TB/template/cache/lxc-webserver.tar.gz'
Total bytes read: 6269102080 (5.9GiB, 124MiB/s)
Detected container architecture: amd64...
Notes:
- Instead of
-storage ssd-1TBwe need to use-rootfs ssd-1TB:32in order to create large enough vm-disk (32G in this case), otherwise with the default size in most cases you will end up with insufficient disk space space. - Instead of
ssd-1TB:vztmpl/lxc-webserver.tar.gz, we can use/mnt/pve/ssd-1TB/template/cache/lxc-webserver.tar.gzor even justlxc-webserver.tar.gz. - Also the options could be provided by double
--or by single-dash.
Post Installation Setup
1. Depending on the way how the original container is initially created, you may need to remove some files from /etc/update-motd.d/. Here is the content of that directory of a naively created PVE CT (Linux container).
ls -1 /etc/update-motd.d/
00-header
10-help-text
50-motd-news
88-esm-announce
91-contract-ua-esm-status
91-release-upgrade
92-unattended-upgrades
2. Depending on your LAN DHCP setup you may want manually set a static IP from the instance.
sudo nano /etc/netplan/50-cloud-init.yaml # The name of your conf file culd be different
network:
    version: 2
    ethernets:
        eth0:
            addresses:
                - 172.16.17.177/24
            nameservers:
                addresses: [172.16.17.151, 1.1.1.1, 8.8.8.8, 8.8.4.4]
            routes:
                - to: default
                  via: 172.16.17.1
sudo nano /etc/cloud/cloud.cfg.d/99-disable-network-config.cfg
network: {config: disabled}
sudo netplan apply
sudo ip addr show eth0 | grep -w 'inet'
inet 172.16.17.177/24 metric 100 brd 172.16.17.255 scope global dynamic eth0
3. Finally you may want to remove some packages and apt repositories.
sudo rm /etc/apt/sources.list.d/droplet-agent.list
sudo apt remove droplet-agent droplet-agent-keyring
References
- ProxmoxVE Documentation:
pct - ProxmoxVE Wiki: Linux Container
- ProxmoxVE Wiki: Unprivileged LXC containers
- Proxmox Forum: Custom disk size and storage with 'pct create'
- Linux Containers: LXC > Security > Privileged and Unprivileged containers
- Linux Containers Discuss: Check privileged or unprivileged
- Linux Containers Discuss: Run-parts: /etc/update-motd.d/98-fsck-at-reboot exited with return code 2 (post installation setup)
- Linux Containers Discuss: Simple script to convert any gnu/linux machine into a proxmox lxc container (more directories and files which can be excluded)
- Server Fault: How to migrate a regular LXC container to a Proxmox LXC container?
- Mi blog lah!: How to view the files of your LXD container from the host
- GitHub Gist: tinoji/proxmox_lxc_pct_provisioner.sh (more commands and ideas)
- TecAdmin: How to Configure Static IP Address on Ubuntu 22.04 [Method 2] (post installation setup)
- TechMint: 10 Useful “IP” Commands to Configure Network Interfaces (post installation setup)