QEMU/KVM GPU Passthrough Setup Windows Guest for RDP
All following steps are performed at Windows 11/10 guest's side. The examples below are give for NVIDIA Tesla K20Xm, attached to my home lab server, but they are applicable for other models and brands video cards. NVIDIA Tesla K20Xm is headless and the main idea of this guide is to use it as default video card within remote desktop sessions.
Required Software
Once the VM is successfully boot in Windows 11/10 the first step you need to do is to install an appropriate NVIDIA driver for the passthrough GPU adapter (accelerator). In my case, with Tesla K20Xm, I'm using the NVIDIA driver 472.98-data-center-tesla-desktop-win10-win11–64bit-dch-international.exe.
You will to install also GPU‑Z. And optionally you can install MSI Afterburn and some performance test software like those provided by PassMark. After the installation of the driver and the other packages you need to reboot the virtual machine.
If this is new installation don't forgot to add QEMU/VirtIO guest tools:
- Windows VirtIO drivers ISO – mount this ISO as second CD-ROM during the Windows guest installation process,
- Windows Spice guest tools – install this package in a Windows guest instance.
Nvidia SMI Settings
Run Command Prompt as Administrator and preform the following command to list the available Nvidia devices.
nvidia-smi -L
GPU 0: Tesla K20Xm (UUID: GPU-f60379d4-45d8-e070-daa4-5fcb178579b0)
Run the following command to view verbose output of he available Nvidia devices and their general settings.
nvidia-smi
Mon Mar 14 23:39:33 2022
+-----------------------------------------------------------------------------+
| NVIDIA-SMI 472.98       Driver Version: 472.98       CUDA Version: 11.4     |
|-------------------------------+----------------------+----------------------+
| GPU  Name            TCC/WDDM | Bus-Id        Disp.A | Volatile Uncorr. ECC |
| Fan  Temp  Perf  Pwr:Usage/Cap|         Memory-Usage | GPU-Util  Compute M. |
|                               |                      |               MIG M. |
|===============================+======================+======================|
|   0  Tesla K20Xm         TCC  | 00000000:01:00.0 Off |                    0 |
| N/A   50C    P8    19W / 235W |      9MiB /  5696MiB |      0%      Default |
|                               |                      |                  N/A |
+-------------------------------+----------------------+----------------------+

+-----------------------------------------------------------------------------+
| Processes:                                                                  |
|  GPU   GI   CI        PID   Type   Process name                  GPU Memory |
|        ID   ID                                                   Usage      |
|=============================================================================|
|  No running processes found                                                 |
+-----------------------------------------------------------------------------+
In the above output we can see the GPU is in TCC mode which is the compute mode of the accelerator. In order to use it as GPU we must switch it to WDDM mode by the following command. Where -g {id} indicates the number id of the GPU – GPU 0 from the first command.
nvidia-smi -g 0 -dm 0
Set driver model to WDDM for GPU 00000000:01:00.0.
All done. Reboot required.
Reboot the system and check the mode again – it should be WDDM. In addition nvidia-smi will output and a table that contains report about the GUI processes currently using the GPU. Some information like as the current temperature will disappear, but now you can read this data via GPU‑Z or MSI Afterburn.
In my opinion step and proper setup of Group Policy for RDP are the enough to use the Tesla as GPU. However in the most manuals is recommended to tweak also the registry, related to the certain GPU accelerator, se we will pass through these steps too in the next sections.
RegEdit Settings
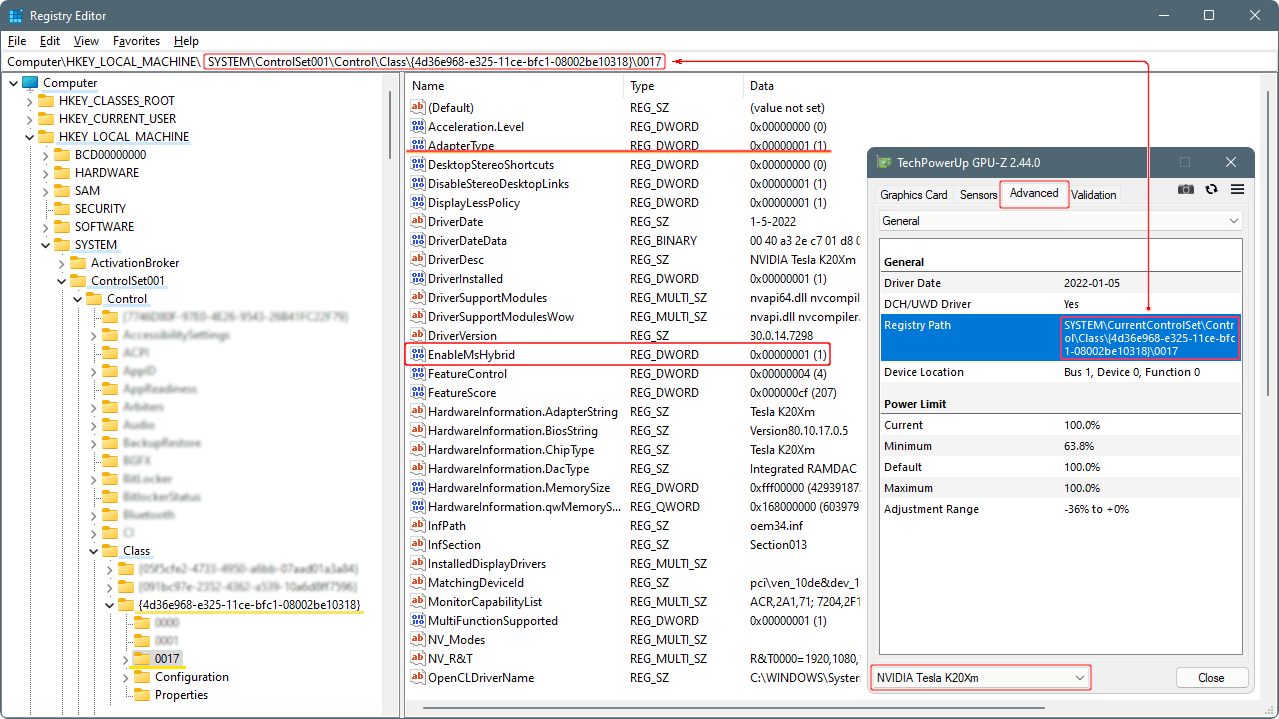
As I said before, I'm not sure this step is required, because Video 1 is taken before its implementation, but most of the similar manuals recommend to delete the DWORD AdapterType:(1) аnd create a new DWORD EnableMsHybrid:(1) within the Windows' registry folder of the GPU – Figure 1.
I think these options are useful in a case as this, where you have onboard GPU and headless accelerator like Tesla, and you want to render the video output via the accelerator – like it is on the laptops. Thus, by performing this step, you will be able to choose the GPU to be used with certain application(s). For more details explore "Nvidia Control Panel > Manage 3D Settings" and/or "Windows Settings > System > Display > Graphics".
To perform this step – first run GPU‑Z, navigate to the Advanced tab and copy the value of the entry Registry Path (for the discussed GPU). Then run regedit.msc – find it by the search option within the start menu. In the command line of the Registry Editor (which is located at the top bar) type Computer\HKEY_LOCAL_MACHINE\ and then paste the registry path copied from GPU‑Z and press Enter. Here is how the Registry Path looks in my case.
regedit.msc
Computer\HKEY_LOCAL_MACHINE\SYSTEM\ControlSet001\Control\Class\{4d36e968-e325-11ce-bfc1-08002be10318}\0017
It could take a while to find the target folder. Once it is opened, find the entry AdapterType and remove it by the context menu of the right muse button. Then click somewhere at the whitespace and from the context menu create New > DWORD (32-bit). Name the new entry EnableMsHybrid and press Enter. Then do double click at the new entry and in Hexadecimal enter 1 for value and click OK. Finally reboot the system to apply the changes.
Group Policy Settings
The video manual Use ANY Headless GPU for Gaming in a Virtual Machine! provides an example how to use Parsec Streaming Server to get high speed video connection for remote game playing.
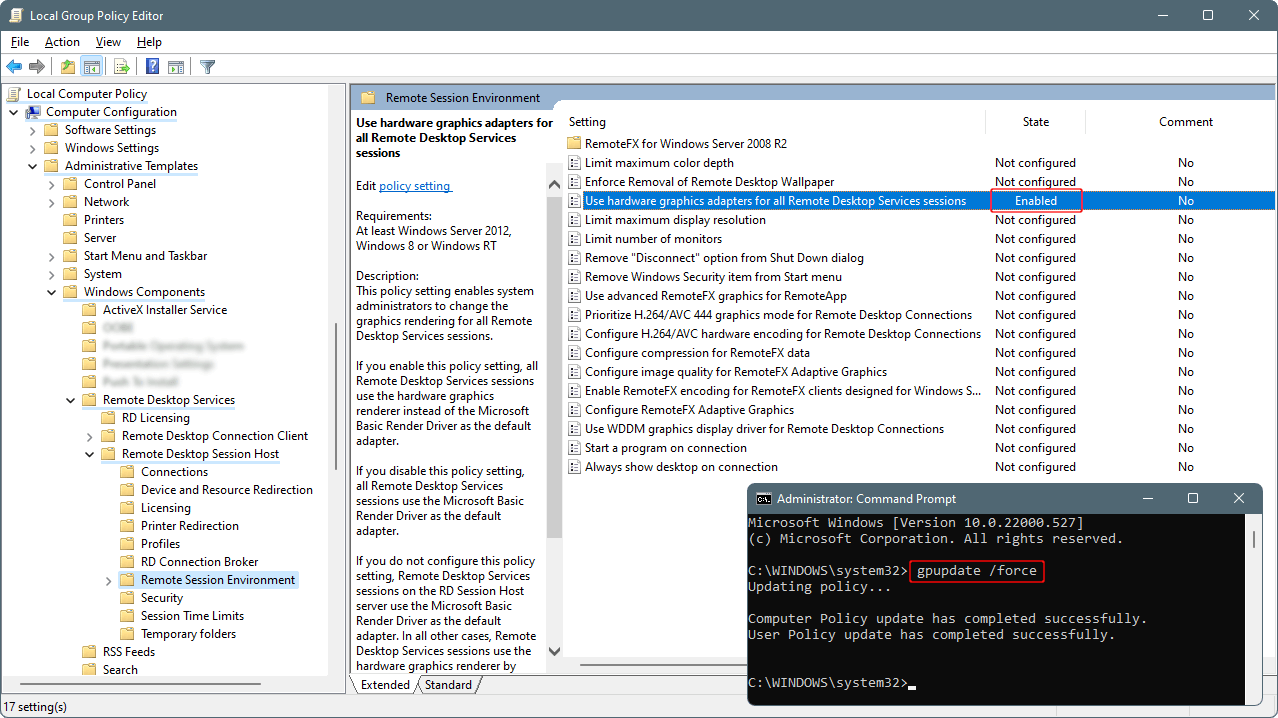
According to my needs, I decided it is enough to use the setup provided in the manual How to Enable GPU rendering on Windows 10 and Windows Server 2019 for Windows Remote Desktop Protocol (RDP) – Figure 2 is a synthesis of this approach.
gpedit.msc
Local Computer Policy
 + Computer Configuration
    + Administrative Templates
       + Windows Components
          + Remote Desktop Services
             + Remote Desktop Session Host
                + Remote Session Environment | at the right siide >
"Use the hardware default graphics adapter for all Remote Desktop Services sessions": "ENABLE"
gpupdate /force # to apply the changes or reboot the system
Nvidia SMI Settings for Overclocking
Here are listed few additional nvidia-smi commands that may help you if you want to overclock the GPU. The main source of these is the article Gaming, on my Tesla, more likely than you think:
nvidia-smi ‑acp 0– this gives you admin Nvidia privilege (deprecated command),nvidia-smi ‑pm 1,nvidia-smi –auto-boost-permission=UNRESTRICTED ‑i 0– for some reason you have to input these two commands to make afterburner stick,nvidia-smi ‑q ‑d SUPPORTED_CLOCKS– this will tell you what you can SET… First you’ll set MSI Afterburner to the desired clocks, it won’t set them until we usenvidia-smi, so if I want 1100 MHz I’ll do +225 in afterburner, THEN enter this commandnvidia-smi ‑ac 3004,1100… The first number is the RAM speed and the second number is the Core clock… If I were to give plus 121 MHz to the memory and +250 to the Core in afterburner I would then need to inputnvidia-smi ‑ac 3125,1100.- Also if you are memory overclocking I would disable ECC support, this can also be done through:
nvidia-smi ‑e 0.
Currently at my system there is not enough cooling and power supply to perform overclocking and comprehensive performance tests, but as you can see in Video 1 the card works at its maximum default Core and RAM speed when it is needed. I'm not sure it is mandatory but before the test at the mentioned video I was executed the following commands.
nvidia-smi -g 0 -dm 0
==============NVSMI LOG==============

Timestamp                                 : Tue Mar 15 14:58:39 2022
Driver Version                            : 472.98
CUDA Version                              : 11.4

Attached GPUs                             : 1
GPU 00000000:01:00.0
    Supported Clocks
        Memory                            : 2600 MHz
            Graphics                      : 784 MHz
            Graphics                      : 758 MHz
            Graphics                      : 732 MHz
            Graphics                      : 705 MHz
            Graphics                      : 666 MHz
            Graphics                      : 640 MHz
            Graphics                      : 614 MHz
        Memory                            : 324 MHz
            Graphics                      : 324 MHz
nvidia-smi -ac 2600,784
Applications clocks set to "(MEM 2600, SM 784)" for GPU 00000000:01:00.0
All done.
References
- Craft Computing at YouTube: Use ANY Headless GPU for Gaming in a Virtual Machine! (Example for usage of Parsec Streaming Server)
- Level One Techs Forum: Gaming, on my Tesla, more likely than you think (List of commands for Nvidia-smi and Tesla OC and Registry setup)
- Linus Tech Tips: Using an NVIDIA Tesla K80 for Gaming on Windows (List of commands for Nvidia-smi and Tesla OC and Registry setup; Comments)
- NVIDIA Driver Downloads (
472.98-data-center-tesla-desktop-win10-win11–64bit-dch-international.exeis in use with Tesla K20Xm) - Microsoft docs: Remote desktop Windows 10 GPU not being able to use it
- BLOG‑D Without Nonsense: How to Enable GPU rendering on Windows 10 and Windows Server 2019 for Windows RDP


