Kali Linux Desktop PC Initial Setup: Difference between revisions
| Line 9: | Line 9: | ||
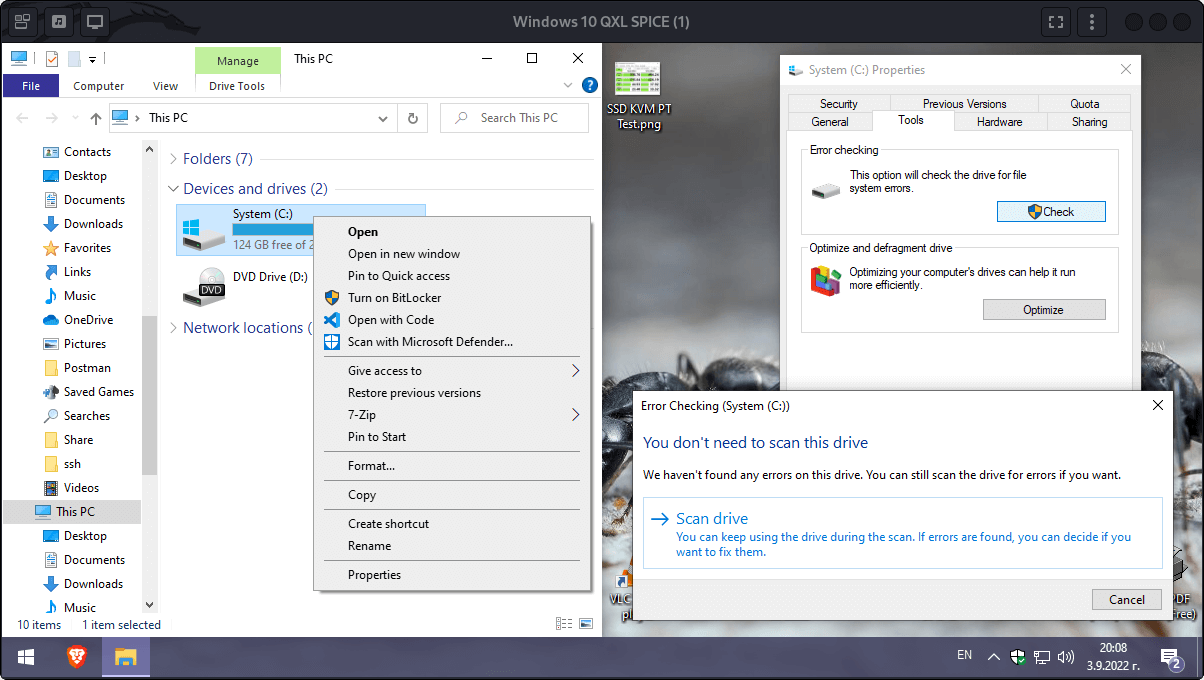
* Boot into Windows 10 and repair the file system. Within This PC application - {{Media-cite|sf|1}}, right click on the shrieked system partition an choose properties {{Pti|s=1|i=1|c=green}}, then from the system properties dialogue choose the Tools tab {{Pti|s=1|i=2|c=green}} and click on the Check button {{Pti|s=1|i=3|c=green}}, after that confirm the error checking dialogue {{Pti|s=1|i=4|c=green}}. Repairing the file system from Windows is important, otherwise CloneZilla may throw errors despite the system is fully operational at first glance. | * Boot into Windows 10 and repair the file system. Within This PC application - {{Media-cite|sf|1}}, right click on the shrieked system partition an choose properties {{Pti|s=1|i=1|c=green}}, then from the system properties dialogue choose the Tools tab {{Pti|s=1|i=2|c=green}} and click on the Check button {{Pti|s=1|i=3|c=green}}, after that confirm the error checking dialogue {{Pti|s=1|i=4|c=green}}. Repairing the file system from Windows is important, otherwise CloneZilla may throw errors despite the system is fully operational at first glance. | ||
* Then use [https://clonezilla.org/downloads.php CloneZilla] live image and clone the disk (1TB NVMe > 250GB SSD). You need to disable the disk size check within the advanced options. | * Then use [https://clonezilla.org/downloads.php CloneZilla] live image and clone the disk (1TB NVMe > 250GB SSD). You need to disable the disk size check within the advanced options. | ||
* When the Windows 10 installation is cloned - optionally turn-off the system and disconnect the drive with the original installation, - boot in to the new cloned instance, repair the file system once again. After that, | * When the Windows 10 installation is cloned - optionally turn-off the system and disconnect the drive with the original installation, - boot in to the new cloned instance, repair the file system once again. After that, right click on "This PC" and choice the Manage option from the context menu. Go to the disks section and extend the system partition to occupied the free space. Then you may check for error once again. | ||
{{sform|1|Windos10-repair-file-system.png|1|{{pt|s=1|i=1|c=green|a=270|x=286|y=126|z=1.2}}{{pt|s=1|i=2|c=green|a=0|x=864|y=610|z=1.2}}{{pt|s=1|i=3|c=green|a=0|x=1070|y=520|z=1.2}} | {{sform|1|Windos10-repair-file-system.png|1|{{pt|s=1|i=1|c=green|a=270|x=286|y=126|z=1.2}}{{pt|s=1|i=2|c=green|a=0|x=864|y=610|z=1.2}}{{pt|s=1|i=3|c=green|a=0|x=1070|y=520|z=1.2}} | ||
{{pt|s=1|i=4|c=green|a=0|x=736|y=214|z=1.2}} | {{pt|s=1|i=4|c=green|a=0|x=736|y=214|z=1.2}} | ||
Revision as of 14:41, 11 November 2022
This is a short guide which covers my setup of Kali Linux as desktop environment. It doesn't cover the installation process of Kali Linux itself. Currently Kali Linux is dual-boot width Windows 10 and something more Windows 10 is turned (also) to a QEMU/KVM guest operating system and can be accessed from inside Kali Linux, more details about this point are provided in the article: QEMU/KVM on AMD Ryzen 9 Desktop with Dual-boot and Passthrough.
Preparation
At this particular system are installed 1TB NVMe device and 250GB SSD device. Initially Windows 10 was occupied the entire 1TB NVMe. I was able to shrink it and move it to the 250GB SSD by the following steps.
- Boot into live Linux image (Ubuntu/Kali Linux) from USB and use the GParted tool to shrink the Windows 10 main partition under 240 GB. Within the native disk management it was not possible to shrink the partition under 300GB.
- Boot into Windows 10 and repair the file system. Within This PC application – Screen 1, right click on the shrieked system partition an choose properties 1, then from the system properties dialogue choose the Tools tab 2 and click on the Check button 3, after that confirm the error checking dialogue 4. Repairing the file system from Windows is important, otherwise CloneZilla may throw errors despite the system is fully operational at first glance.
- Then use CloneZilla live image and clone the disk (1TB NVMe > 250GB SSD). You need to disable the disk size check within the advanced options.
- When the Windows 10 installation is cloned – optionally turn-off the system and disconnect the drive with the original installation, – boot in to the new cloned instance, repair the file system once again. After that, right click on "This PC" and choice the Manage option from the context menu. Go to the disks section and extend the system partition to occupied the free space. Then you may check for error once again.

Installation
How to install Kali Linux alongside Windows is well describe in the following resources. In addition, I would physically disconnect the Windows' drive when this is possible.
- Kali Docs: Dual Booting Kali with Windows
- TenForum: How to Turn On or Off Fast Startup in Windows 10
- Adam Macdonald at YouTube: How to Dual-Boot Windows 10 and Kali Linux
Post Installation
Enable Bluetooth
In Kali Linux 2022 the Bluetooth service is disabled by default. In order to enable it run thew following command.
sudo systemctl enable --now bluetooth.service
sudo nano /etc/default/grub
# SZS: https://wiki.metalevel.tech/wiki/Kali_Linux_Desktop_PC_Initial_Setup
GRUB_DISABLE_OS_PROBER=false
sudo update-grub
References
Install the latest Nvidia Driver
Here I'm going to install the Latest NVIDIA Driver, recommended for Quadro T600, which is not presented in the Kali's repository. The first step is to download the latest driver: NVIDIA Driver Downloads > Quadr/RTX T600 > LINUX X64 (AMD64/EM64T) DISPLAY DRIVER.
Then Blacklist the default Nouveau driver:
sudo nano /etc/modprobe.d/blacklist-nouveau.conf
blacklist nouveau
options nouveau modeset=0
sudo update-initramfs -u
After that reboot the system. If the log-in screen come back – don't log-in, but probably there will be blank screen wit blinking cursor. In both cases, press Ctrl+Alt+F3, log-in to a TTY, and remove any existing NVIDIA Driver:
sudo apt remove '*nvidia*'
And then install the driver.
cd ~/Downloads
chmod +x NVIDIA-Linux-x86_64-515.65.01.run
sudo ./NVIDIA-Linux-x86_64-515.65.01.run
sudo nvidia-xconfig
Finally reboot the system once again. If there are some performance issues check NVIDIA Settings > PowerMizer > Performance Mode. You can change the default performance mode by changing xorg.conf or you can change it via the CLI by the following commands.
nvidia-settings -a [gpu:0]/GPUPowerMizerMode=0  # Adaptive
nvidia-settings -a [gpu:0]/GPUPowerMizerMode=1  # Prefer Maximum Performance
nvidia-settings -a [gpu:0]/GPUPowerMizerMode=2  # Auto
nvidia-settings -a [gpu:0]/GPUPowerMizerMode=3  # Prefer Consistent Performance
References
Gnome Extensions
Don't update the extensions delivered by Kali Linux from the GNOME Shell Extensions page!
The package gnome-browser-connector is not yet available to the Kali's repository – that cause the message: Your native host connector do not support following APIs: v6., – in the browser. Currently everything works despite the mentioned message. In case there is a problem, instead of adding new extensions via the browser we can use gnome-shell-extension-manager.
sudo apt install gnome-shell-extension-manager
Another way is to download and install the extensions manually – reference.
gnome-extensions install -f <name of downloaded zip file>.zip
Also keep in mind there is a couple of default extensions available in the OS' repository.
sudo apt install gnome-shell-extension-[Press TAB]
gnome-shell-extension-appindicator             gnome-shell-extension-impatience
gnome-shell-extension-arc-menu                 gnome-shell-extension-kimpanel
gnome-shell-extension-autohidetopbar           gnome-shell-extension-manager
gnome-shell-extension-bluetooth-quick-connect  gnome-shell-extension-panel-osd
gnome-shell-extension-caffeine                 gnome-shell-extension-pixelsaver
gnome-shell-extension-dashtodock               gnome-shell-extension-prefs
gnome-shell-extension-dash-to-panel            gnome-shell-extension-proxyswitcher
gnome-shell-extension-desktop-icons-ng         gnome-shell-extension-shortcuts
gnome-shell-extension-easyscreencast           gnome-shell-extension-sound-device-chooser
gnome-shell-extension-freon                    gnome-shell-extension-system-monitor
gnome-shell-extension-gamemode                 gnome-shell-extension-tiling-assistant
gnome-shell-extension-gpaste                   gnome-shell-extension-top-icons-plus
gnome-shell-extension-hamster                  gnome-shell-extension-vertical-overview
gnome-shell-extension-hard-disk-led            gnome-shell-extension-volume-mixer
gnome-shell-extension-hide-activities          gnome-shell-extension-weather
Notes about some extensions:
- Dash to Panel | Reset settings:
dconf reset ‑f /org/gnome/shell/extensions/dash-to-panel/ No overview at start-up– not longer required because such feature is available in Dash to Panel extension.- Tiling Assistant |
WinTile: Windows 10 window tiling for GNOME+Useless Gaps - Screenshot Window Sizer, use Ctrl+Alt+S and Ctrl+Alt+Shift+S
- Pop Shell: Support Articles @System76 | GitHub | Theme GitHub
- List of all currently installed extensions
- Ubuntu App indicator: How to use custom icons?
Deploy Segoe UI Font
bash <(curl -s https://raw.githubusercontent.com/mrbvrz/segoe-ui-linux/master/install.sh)
Additional Software Installation and Tweaks
- Create a Custom Display Switch Option by Xrandr and Pactl
- Kali Linux Printer Setup
- Visual Studio Code on Linux
- Kali Linux Install xRDP
- Kali Linux Install Brave browser + Tmpfs Tools Profile Sync Daemon (PSD)
- Kali Linux Install Telegram
- Kali Linux Install Viber
- Kali Linux Install Messenger
- Kali Linux Install Skype
- Kali Linux Install NextCloud Client
- GNOME Shell Fix the Open in Terminal Option
- QEMU/KVM on AMD Ryzen 9 Desktop with Dual-boot and Passthrough
- Kali Linux Install GUFW (gui-ufw)
- Offensive Security: Customizing Kali Linux
- ONLYOFFICE Desktop Editors for Linux
- How to install plugins in ONLYOFFICE Desktop Editors | Plugins List | To make it looks more native, once it is installed, open a terminal window and run
onlyoffice-desktopeditors --system-title-bar, then close the application window – the setting will be remembered. - Launchpad: LibreOffice Fresh
Ask Ubuntu: How do I use the mouse in TTY?sudo apt install gpm- Troubleshooting: